This website has been archived from TrainWeb.org/diez-mon to TrainWeb.US/diez-mon.
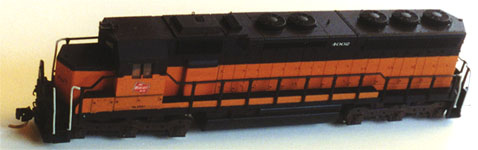
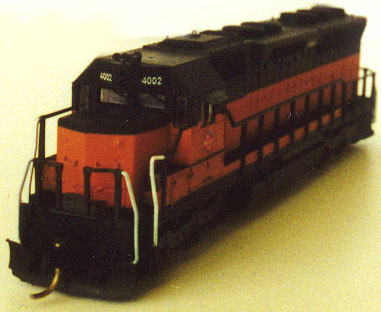
Milwaukee 4002 in N Scale
 My first modeling attempt since my re-birth into the hobby was Milwaukee
SD45 #4002. I didn't want to do any bashing for my first project
and Kato's SD45 was the best match. I started the a Kato in Erie paint
scheme. Milwaukee 4002 has the brake wheel and horns in the
proper position so I didn't have to make any drastic changes to the body
of the model. My modeling era is the early 1970's so the unit will
not have the large "Milwaukee Road" text on the long hood and nose. This
project would allow me to practice my painting skills while trying a few
new things I haven't attempted. It was my first N scale attempt at
fully detailing and painting a locomotive.
My first modeling attempt since my re-birth into the hobby was Milwaukee
SD45 #4002. I didn't want to do any bashing for my first project
and Kato's SD45 was the best match. I started the a Kato in Erie paint
scheme. Milwaukee 4002 has the brake wheel and horns in the
proper position so I didn't have to make any drastic changes to the body
of the model. My modeling era is the early 1970's so the unit will
not have the large "Milwaukee Road" text on the long hood and nose. This
project would allow me to practice my painting skills while trying a few
new things I haven't attempted. It was my first N scale attempt at
fully detailing and painting a locomotive.
First, I separated the model into it's components: shell, cab, handrails, and sill section. I next attempted to strip the model with brake fluid. I have heard the Pine-Sol is Kato safe but I didn't have any on hand and didn't feel like running to the store at the time. I wasn't able to remove all the paint from the shell but most of it along with the numbers was taken off. It's true what they say about Kato Yellow, that stuff just does NOT want to come off. I then went to work on removing all the cast on details with an exacto #11 and chisel blade. I removed all grab irons, lift rings, and coupler lift bars from the shell. Once these were removed I drilled all the holes for grabs, lift rings, and coupler bars using a #80 drill and pin vise. Gold Medal Models grab iron template comes in very handy for drilling grab iron locations. Otherwise you can use the locations of the molded on grabs. I used brass wire for grab irons and coupler lift bars. Gold Medal Models lift rings and windshield wipers were also used. I find their grab irons to be too thick for my taste but the templates are well worth the investment in a set. Once all holes had been drilled I was ready to paint! I hadn't worked with acrylics before so this was to be my first experience with them. I have to say, the results are very nice. I used PollyScale Engine Black and Milwaukee Road Orange. I prepared the shell by washing it lighty with dishsoap and warm water to remove and dirt and oil that has been deposited from all that handling. After this point I only handled the shell with latex gloves.(a handy purchase from Walmart) I then dried the model with a hairdryer. Painting was done in my home made spray booth in my shop. Now, here's where I screwed up... I first painted the model with Engine Black, realizing later that Orange should have been the first color! I mixed the paint about 80/20% with distilled water in a paint cup and used 35psi to spray. I found that you can make coats a little heavier than the solvent based paints I'd been used to. I still find it preferable to apply several light coats, rather than few thick coats. I then set the model aside to dry. You can actually help the drying along with a hair dryer. It's easy to finish an entire project in one sitting this way. It was now time to mask. I used 3M masking tape, cut on a mirror so I'd have nice fine straight edges. Now, since I've painted black first, I have to mask for the orange... this proved to be difficult because of the small areas of black that I needed to mask off, like the top of the nose. Orange first would have been MUCH easier. Then I could have cut a tape strip the height of the orange and applied it all the way around. Anyway, once my masking was done I was ready to apply my Orange color. Using an Idea I'd read in rec.models.railroad, I first sprayed a clear coat..hoping that it would help seal the edge and stop any color from seeping under the tape. I again mixed my paint 80/20% and applied thin successive coats(MANY coats) until I had a nice solid orange. Painting the orange first would have helped here as well. Painting light colors over dark is never preferable. I used a hair dryer to speed drying of the orange, as I didn't want to leave the tape on any longer than I had to. Using a tweezers I gently removed the tape. Use a sharp angle when pulling the tape and pull SLOW so you don't pull any paint up with it. WOW, it turned out as well as I had hoped.. it was already looking like the real Milwaukee unit. The clear coat appears to have stopped any seeping and I was now ready to apply details and decals. Using a flat miniature needle nosed pliers I created my brass wire grab irons and installed them using ACC from the inside of the shell. Lift rings, windshield wipers, and coupler bars were held fast the same way. I then attached the snow plow using 5 minute epoxy. I prefer epoxy because it give me time to make minor adjustments. Once everything was dry I used a small brush to touch up the new details to match the body colors. I then used a very small brush to paint the step handrails flat white. I never liked the way trucks seem to disappear into the shadows so I used black and brown chalks to highlight the trucks and fuel tank. I will eventually apply further weathering to the rest of the model. I'd been looking for a way to make number boards more flush fitting than they are. Just snapping them in has a much too recessed look to me. I eventually came up with a method that works very well. I cover the numberboards from the outside using masking tape, making sure to have a nice tight fit over the hole. Then, from the inside, I apply 5 minute epoxy to fill them in. When dry remove the tape and you are left with a smooth flush surface to mount your numbers. After receiving my bag of white LED's that I got from my brother who is an Electrical Engineer I replaced the front LED in the unit. This was a simple 1 to1 replacement and makes a WORLD of difference. I then made a small tube using aluminum foil to direct light to the headlight and not so much into the windshield. This was my first attempt at creating and using my own decals created in Corel Draw 8.0 and printed with my ALPS MD1000 on Decal Paper from Tom Prestia at Tango Papa Decals. For the white unit numbers on the long hood I used Benn Coifman's RR Roman font. I've also been creating some of my own fonts, but that's a story for another page. I used Solvaset to settle the decals down, although I didn't really need to since decals were only applied to smooth surfaces. When decals were applied and completely dry I sprayed the model with PollyScale flat clear finish to hide any decal edges. I prefer a flat finish to my models and PollyScale looks very nice to me. Finally, I put the windows back into the cab and assembled the shell. After I replaced the rapido couplers with Micro Trains #1015's my SD45 #4002 was ready to haul. All I have to do now is finish my layout! |
   |
| Home | Pictures | Hobbies | Links | Contact me here.. |
|---|