You may want to print this to keep handy while doing your report.
First, download all your photos to a photo editing program
(Picasa, iPhoto, etc.). Individually select the photos to use in
the Report, then complete the editing, and cropping, saving into a
separate folder.
Second, create a folder on your hard drive with the title of your
report (no spaces in your folder title, but capitalize each
word). Copy the following items from the "YourReport"
Folder into this new folder: 640, IMG_4866.jpg, index.html,
Template.html, Tutorial.html.
Third, Export the selected photos as 640 pixels to the "640" folder in
the folder with the title of your report as its name. Next, export
these same photos, size 320 pixels to the folder with the title of your
report as its name. (NOT the internal folder titled "640")
Fourth, Open the "Template.html" file in KompoZer, and "Save As"
"index.html" or "index.htm" into the folder named for your report, if
asked if you want to 'overwrite' the older "index.html" folder, say,
"Yes."
Now you should have in your Report Folder: An internal folder,
titled "640" with with 640-sized photos, a file titled, 'index.html' in
the main folder, and all the photos you want to use in your report,
sized to 320 pixels, in the main folder. Also, these two files: Template.html and Tutorial.html.
Fifth, Open the Index.html file (unless the Template.html file is
already open, renamed to index.html). Start replacing the "text"
lines in the file with your story. When you are ready for photos
in your story, depending on how many photos go into the report at this
point, from the bottom of the 'index.html' file, copy a table with 4,
2, or 1 photos and paste it into the report.
1. Double click the first photo in the table and under "Image
Location" remove "IMG_4866.jpg" and insert your image number.
(A good way of knowing which image you want, have
your photo editing program open to the files for your report and just
copy the image number and paste it)
2. Click the "Location" tab and remove "IMG_4866.jpg" from the
"640/IMG_4866.jpg" (leaving the 640/) and replace it with your image
number.
(While doing each of the first two steps, you should see your image in the "Image Preview" window.)
3. Click the "Appearance" Tab and be sure that "Left and Right"
is 10; and "Top and Bottom" is 10; and "Solid Border" is 0.
3. Highlight "Description of Photo" and replace it with the
description of your photo, or delete entirely for no description.
"Save" often
as you work on your story.
Sixth, Once your report with photos is finished, erase the photo
tables at the bottom of the file. Save the file one last time.
Seventh, On an Internet-connected computer, use your browser to open the "index.html" file from the report
folder. Go through the report, double clicking the
links to make sure that all the links work on the Internet, and
double-clicking all photos checking to see that the links are correct
to the larger photos.
Eighth, When all proofreading is complete and the report works on
your computer in your browser, use an FTP program to upload the Report
Folder to your web space at Trainweb.org. I use Fetch on my Mac
to upload report folders to TrainWeb.org/carl.
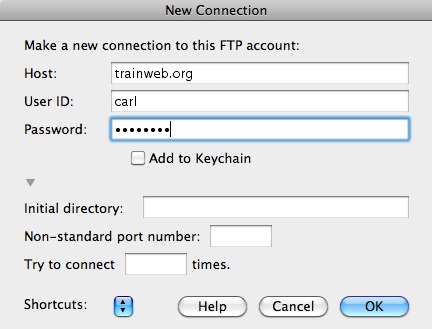
You will need to use the following information to Log On:
Host:
tainweb.org User ID: (probably your
first name) Password (Steve Grande will provide this,
probably your first name plus 4 numbers) Finally, click
OK.
Once you successfully log on, you will see this screen:
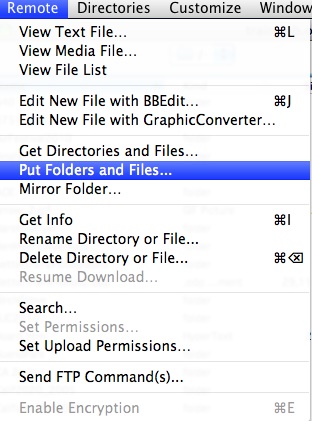
Click "Put Folders and Files..."
Next you will see this screen
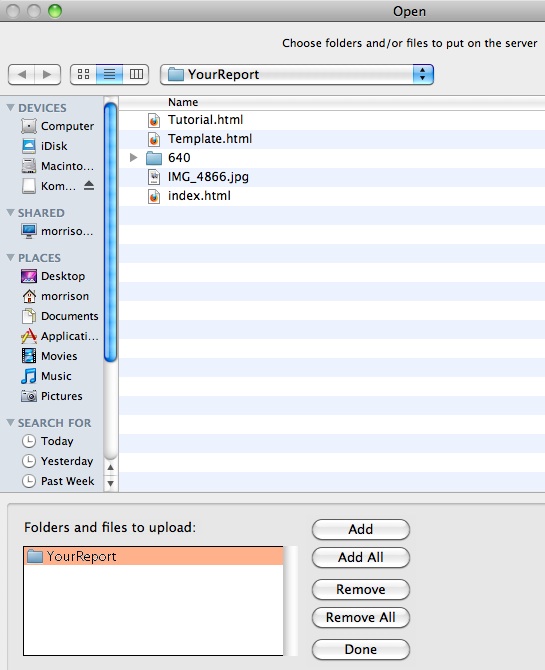
Add the Report folder and click "Done",
then "Open", and on the next screen "OK". This will take some
time to upload all the photos in the Report Folder and the photos in
the "640" folder, so take a break.
To see your report on the Internet, Go To:
http://trainweb.org/(YourName)/(NameOfYourReportFolder)
This should start the 'index.html' file in your folder, and you can
check links again online.
Once your report works without error, notify those you want to read your report, giving them this link:
http://trainweb.org/(YourName)/(NameOfYourReportFolder) Copied from your browser and inserted in the e-mail announcement.
Problems with this tutorial, contact: Carl@TrainWeb.com